| Your
First Steps
=1= Getting Started
First, you're going to need a
copy (legal please), of either Microsoft Flight Simulator 98
or 2000. Install the FS software following the
instructions relevant to your operating system and
version. We assume, that you
are already familiar with installing and using the Flight
Simulator software that you have. If not, feel free to
contact the CEO for more help. Once
you've installed your version of FS98 or FS2000, you will need
to have an internet connection - obviously - to access this
website.
=2= Make Yourself at Home
Although it takes some time at
the beginning, we highly recommend that you make yourself
completely "at home" with our website. Read up
on the company and its staff members. Take the time to
browse through a couple months of our NOTAMs
(short for - NOtices To AirMen).
Reading these "news bulletins" regularly, will keep
you up to date with the latest "happenings"
throughout the organization. We
also recommend that you take the time to read our company
newsletter the T.A.U.T.
(short for - The Air Up There - our slogan). This is
published once a quarter (4 times annually), and contains
in-depth information from our CEO and Board members - another
crucial read. After
that, there are two things we recommend you do. The
first, is to sign up with ezBoard.com
so you can gain access to our forums (click
here to jump to the forums page). These
bulletin board areas allow all our pilots to discuss various
issues and topics around our operations, and can be a HUGE
resource for you when you get stuck. We're all here to
help each other out, and there are a number of key pilots out
there who are regular contributors to the forums - especially
helping those new pilots in need.
=3= Getting Your System
Ready
Once you've got your version
of FS installed, it's time to get online, and spend some
quality time getting your system optimized for your career at
Air Pacifica Airlines. Granted, some of these downloads
are BIG - but it can't be helped. For you to be
compatible with everything we offer - and everything you find
out there with all VAs - you're going to have to spend some
time getting ready. For
all downloads, you will need to follow the installation
instructions included in each - carefully - some require you
to reboot between installations, others do not. First
- The Required Parts Get
onto www.FlightSim.com
- one of the largest collections of software and add-ons for
the Flight Simulator enthusiast. Simply HUGE
collection. When you first visit the site, you will see
their "latest news" section. This is a
goldmine of great information - articles, reviews,
editorials, how tos, you name it, and it appears on this
page. However, the files exist on the next page, and you
scroll WAY down to the bottom of the page to find the link
to the Main Menu. This
is a "Membership Preferred" site - which means, that
during peak hours (like 4pm to 10pm), you may find the site
telling you "sorry all nodes are busy". Just
keep clicking the reload/refresh button on your browser -
you'll get in eventually. Buying a membership to the
site will get you in faster - even during peak times - but you
still risk a small wait. Once
you're into the site, scroll down the right-hand side of the
menu and find the File Libraries (Downloads)
section. Click on MUST HAVE FILES. This is
the main stop on your trip here:
- Common Run Time
Libraries
- Grab the FSUIPC.DLL -
latest version from this section
- Microsoft FS 2000
- Grab the Standard
Edition or Professional Edition patch for
FS2000. Remember to ONLY download the one that
matches what version you bought.
- Microsoft FS 98
- Grab the FS98 Patch #1
file
- Grab the FS98 Converter
file
Second -
The Optional Parts
Now that you have (hopefully)
installed the above files (FSUIPC.DLL goes in your MODULES
directory in your Flight Simulator installation directory) -
you are ready to make a choice. You can go back to www.FlightSim.com
and get these optional components, or skip to the next section
"Your FS Settings".
Get back onto the
FlightSim.com site, and back into the Must Have Files
section.
- Microsoft FS 2000
- Airport 2.x Textures
- VOD Textures
- ASD 2.1 Textures
- Microsoft FS 98
- Airport 2.x Textures
- VOD Textures
These files will allow you to
install add-on scenery sets, without having to worry about not
having the textures that the author used when designing his
scenery. Usually every add-on scenery set has some
"custom" textures, but these are always included in
the scenery download. Most authors however, do NOT
include the base textures that the files above contain.
At this point, you have the
option of installing any of the FS98 or FS2000 add-on scenery
that you can find in our Downloads section.
Again, this scenery is OPTIONAL for our pilots - meant to
"enhance" our service area. The default FS98
and FS2000 systems include scenery for all our service points,
as long as you have chosen to install the following default
sceneries:
- Central America
- South-Eastern USA
- South America
=4= Your FS Settings
One of the more frustrating
issues for users of FS (98 or 2000), is getting the simulator
software setup in such a way as to maximize frame rates, while
not making the graphics so bad that you remember what CYAN
screens were like in the 80's. The
following are my personal recommendations, and by all
means, the more powerful YOUR system is, the fewer of these
you will have to change. Additionally, although getting
to these settings is slightly different in FS98 and FS2000 - I
assume you'll be able to find them yourself (email
me if you need more help):
- Scenery Complexity -
Normal, or Mid-Range; YES to stars; YES to approach
lights; moonlight - NO or optional
- Dynamic Scenery -
Sparse or Very Sparse; NO to Air Traffic; NO to Ground
Traffic; NO to Service Traffic; NO to Traffic Outside
Airports
- Options | Preferences
- NO to show opening screen; NO pause on task switch; YES
to log flight time
- Options | Preferences |
Instrument - YES to allow panel resize; YES to Display
Indicated Airspeed; YES to 25 khz COM frequency
- Options | Preferences |
Display | Display Options | Aircraft - YES to aircraft
texture; NO to aircraft shadows; YES to see own aircraft;
YES to see propeller
- Options | Preferences |
Display | Display Options | Map - Map display NORTH
Oriented; YES to map textures
- Options | Preferences |
Display | Display Options | Scenery - NO ground
scenery shadows; YES textured ground, water, sky and
buildings; NO wispy cloud effects; YES cloud thickness;
YES gradient horizon; NO smooth transition; YES image
smoothing
- Terrain Mesh &
Complexity - whatever you find that works for your
system's speed. Low range systems should set these
to lowest systems; mid range systems to the middle; kick
butt systems to the top.
=5= Your First Plane
So, the software's installed,
you've read about us, and now you want to log that first
flight. We'll clearly, before that can happen, you're
going to have to download one of our Air Pacifica Airlines
aircraft! Download
our Piper PA-28-181 Trainer Aircraft. This is
a great little aircraft that will be easy for you to take on
your "first flight" with our airline. Although
the aircraft is for FS98, it will work in FS2000 just fine. Once
you download the aircraft, you will have to install it.
Instructions are in the README.TXT file contained within
it. Once it has been installed, launch your FS
program. We'll assume that you find yourself at Meigs
Airport in Chicago, but at this point, it doesn't matter. Change
your aircraft to the new Air Pacifica PA-28-181 Trainer, and
make sure your Parking Brakes are ON. =)
=6= Configuring Your
"Home" Airport Settings
The last step before taking
your new aircraft out for your first flight, is to get
yourself setup at our main hub - the center of operations for
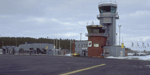
our airline: Cyril E. King Airport, St. Thomas, US
Virgin Islands. To
do this, simply pull down the World menu, and select Go
to | Airport, and you should see a screen like this
(FS2000 users yours will differ slightly, but you get the
idea): 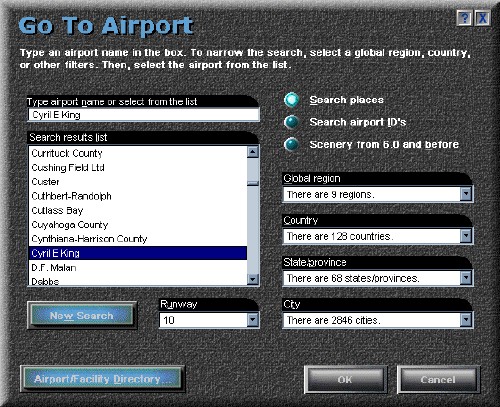
Ensuring
that you have Search Places selected, you should be
able to type in CYRIL E KING into the Airport Name box
and you will find the airport in the list. Click once on
the airport name to highlight the airport (as shown above),
and click OK. This
should be your "similar" view in Spot Plane Mode.
Again, based on what scenery and version of FS you have
installed - your view may be a bit different than mine: 
The
next thing to do, is use SLEW MODE to position your
aircraft at the TERMINAL, instead of on the runway. This
is an important step, especially if you are thinking
about getting involved in online flights. No one likes
to see you "pop up" right on the runway as they are
trying to land or depart! =) You
enter Slew Mode by pressing the "Y"
key. Now your joystick (or keyboard) can be used to
CAREFULLY move your aircraft forward along runway 10, and
eventually over to the terminal that is to the RIGHT of the
runway. NOTE:
Slew mode is SENSITIVE - push to hard on the joystick (or too
many keyboard strokes), and your aircraft will whizz along at
800 miles an hour right past where you want to move to.
You can stop slewing immediately by pressing the "Y"
key again. If
you get lost - start back up on step #6 again, to get oriented
back to the end of runway 10 at Cyril E King airport. If
you made it to the terminal, you should now be positioned
somewhere like this: 
The
important thing now is Saving Your Flight Position,
which can then be used to magically "return" you to
this starting place anytime you are wanting to fly out of St.
Thomas. To Save your flight position, ensure your
Parking Brakes are ON, and your engine is OFF and press
the Semicolon ";" key. This will bring
up the following dialogue window: 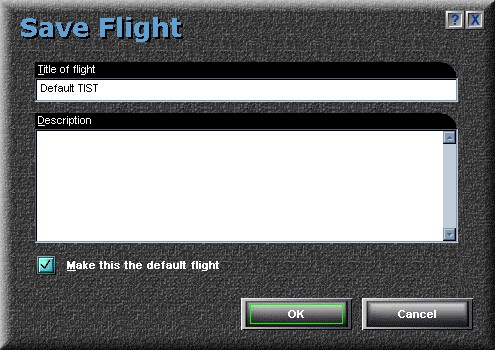
All
you need to do, is pick a title for your flight (suggested
above), ensure that "Make Default" is checked, and
click OK. PRESTO! You've now saved your
default position at St. Thomas, AND saved it in your Air
Pacifica Piper Trainer - you're ready to move onto your first
flight! Click the link below to continue...
===> Next Stop: Your
First Flight
|